.

.
.

What can hands do?
.
Folk & Cultural Arts Club
PEACH Community members always demonstrate a love and skill for any of the crafted folk arts. There is always joy in creating something handcrafted and made of quality materials, passing it on to someone loved, selling one’s work and goods in the Lotte Gallery or co-op. We also hope to broaden our sights and develop other folk arts that interest our residents and members. Skills such as doll making, collage, pencil art, tempera, jewelry casting are just a few suggestions that have been made. Our goal is to inspire the imagination, provide the tools and guidance in order to develop the skills needed to create something rich in both quality and beauty, and sometimes just simply delicious and fun.
The Calendar lists all the topics covered every month:
Fine Arts & Fibers: basket and reed-weaving, wool-spinning, silk-spinning, quilting, needlepoint, sewing, knitting and crochet will be taught and shared.
Practical Home Arts: bee’s wax candle-wicking, soap making, bath salts, traditional medicinal tinctures, culinary, baking, canning, drying, butchering, filleting.
Musical Folk Arts: learning and singing traditional folk songs, playing the fiddle, penny-whistle and concertina.
Skilled Folk Arts: Cordwaining, book-binding, mosaics, paper-making, tree-tapping.
Gatherings for the Folk Arts are conducted in small groups, this way everyone feels they are part of the experience. These gatherings will be led by people practiced and skilled in their discipline and chosen craft. Assistants in the community will be on hand to aid in setting up materials and helping guests to enjoy their experience in a meaningful way. We also hope to create an atmosphere of appreciation and reverence for what nature has provided, and an understanding of the history of these Practical and Folk Arts.
Outside the focused club, there are also successive combinations. Several branches offered through the Folk Arts disciplines, which also reach into all the other clubs. These branches are: family, couples, children, and individual. Each branch meets every week at different locations, save holiday events and vacation. There is an orientation and a printed schedule for each, with a reminded every week from the group’s vezeto, this way participants will know what is coming in the future. There are also teaching opportunities, positions for assistants, studio and time banking help offered. If there is something you do not understand, if you missed a gathering or some instruction, we encourage helping each out other in and outside the gathering time..
.
.
.

.
.
.
Baking and Cooking Club
 The Art of Canning: We incorporate two methods of canning, Pressure Cooking and Boiling. Although most of the canning is done in September. We also can as we harvest throughout the year.
The Art of Preserving: There are a number of ways to preserve foods: jams, jellies, conserves, marmalade, and butters. We apply one or more of these methods to a variety of foods grown in the gardens, but preserving is always done in season and within days after a harvest.
The Art of Drying: Most of the drying is done using herbs and fruits collected in the gardens. However, we are working with one of the local farms and butchers learning to dry fish, turkey, venison and beef.
The Art of Cooking: Breakfast, Lunch, Dinner & Supper: From Swedish pancakes with with lemon and lingonberries preserves, to a fresh tomato bisque and a melted farmer’s cheese sandwich, to a four course Beef Wellington escapade, or a light supper preparing a little flamboyance of a Saganaki cheese, sour dough bread and a small Greek salad drizzled with freshly pressed olives and herbs, all topped off with a small dish of Italian tiramisu gelato, the learning and preparation of foods is something anyone can do and everyone enjoys.
Cheese Mongering: Although we do milk our cow and goat and gather our chicken and duck eggs, we purchase all of our cheese from a local certified cheese monger who lives near our community. Our cheese staples are: Soft and sharp Farmers, French Roquefort, Italian Gorgonzola, Swiss Gruyère and Greek Feta. However, our chef and cooks will use a number of other cheeses for the occasion, but we try to use locally made cheeses when possible..
Monthly Schedule
Jul – Farm Foods & Dairy
Aug – Breakfast
Sept -Jam & Preserves
Oct – Chili
Nov – The Festival Bird
Dec – Cookies
Jan – Soups
Feb – Fish
Mar – Cakes
Apr – Red Meats
May – Breads
Jun – Cold Foods, Refreshments & Appetizers
“Food brings everyone together, bon appétit!” – anon
.
.
.
.
.
.
Basketry
The art of basketry and reed-weaving is one of the oldest and simplest crafts to create, as a folk art it is truly a practical sturdy art form. Basketry requires little skill at first, but can be refined into works of great beauty and fine art that will hold up through generations.
There are two areas in basketry we cover in this particular folk art, the grasses, which include, reeds, grass, bamboo, hazel wood and willow. The vines, which include, grape and ivy. All of these fibers have their strengths, beauty and unique characteristics. Each, also serves a different function.
During the late summer we gather reeds and grasses, cattail fishing. Cattails often grow in and around wetlands, they have rhizome roots that filter out the impurities in the waters, so we have to be careful there are no industrial waste plants near the water table. Cattails can grow 6 feet in height and are often used as decoration. The pods are full of fluffy silky downy seeds, together they are highly absorbent. Sometimes we use these as part of a paste or mixed them in with pulp for papermaking. The stalks are cut about 3 to 6 inched above the swampy land. The supple leaves are long, and narrow, but tough. This is what we use most in the art of basket-weaving.
Hay and corn are other grasses we use, the stalks are easy to bend and somewhat pliable, though sometimes brittle, they can cause slivers. Still, for the well-trained hands they can be so tightly bound that they will hold water.
Bamboo, though not native to our part of the world, we import from a member shop in Florida. Here we take a little time in the spring to weave these tough blond southern fibers. They make for very resilient baskets.
Small black berry, pine needle and scotch broom baskets can be completed in a sitting or two.
Grape and ivy vines are grown all over the property, and we save every trimming. We used both grape and ivy, which create a loose weave and make good baskets for carrying large vegetables and are great for decoration.
Making of willow, cedar and bramble twine and using hazel wood for basket rings.
After some practice with the vines and grasses, many members often wish to work with other materials such as a variety of conifers, willows and a favorite, forsythia.
Depending on the project, some materials are used fresh, and sometimes dried or soaked in large tubs just before weaving to make them pliable and workable.
Most of the materials are gathered and picked at the end of summer and stored for working throughout the year. Grape and ivy can be cut as late as December, the bamboo is generally ordered and comes in handy during early spring.
Some baskets are sold in the Lotte Gallery, since they make wonderful gifts. Others are used for more practical work on the farm and also in the shops.
Every year, during our Charlotte Gallery event in May, we have a competition with three categories. The most skilled, the best design and practical use, and the most creative. Each winner receives any item once a month from our delicious bakery. The works themselves are then awarded as prize in other events within the community. Two of the baskets are then filled with food and other trinkets, then given to the winners of our Greek Olympics. The third is presented to the person who has dedicated the most time helping others in our community.
The atmosphere during these weaving session is like an event, and a reward in and of itself. Many come and lend a hand just to be part of this experience and in taking joy with the community of weavers.
Please check the schedules for the days and hours of these wonderful workshops. Residents and members are always welcomed to join, and the public can register for a number of special classes and workshops. For more information, contact Sally Littlemaker.
.
.
.
.
.
.

Candle-Wicking
From mid-August through October, our bee-keeper Johann Biene scrapes the honey and bees wax from the combs. He then melts and filters the wax. Both the honey and the wax are part of the Community treasure and commodity, we use this gift from the bees as a form of investment and savings. In addition, the wax is used to make candles throughout the months of November and December. Everything in this process of making beeswax candles is used or recycled, and the labor from our bees is both a blessing and instills a deep sense of appreciation. Many in the club also take part in the Garden Club, they experience the whole process of beekeeping, caring and collecting. When the wax-collecting is completed, we set out to make beeswax candles. The process is simple, we use several double boilers to melt the blocks of wax in a variety of different size cans and produce candles that are 4″, 6,” and 8″ long. Narrow planks of wood are cut with notches and strung with cotton wicks. Each set of planks hold six candles, the wicks are then dipped, cooled on the rack, and then dipped again until they are the perfect size for burning. All our candles burn fully, nothing is wasted, There are also special moulds used for candles in the chapel, two sisters, Lisa and Liza, will create beautiful nature scenes and floral patters for these particular candles. Occasionally, they will do a special orders upon request, and they are more than happy to teach others how to create these wonderful works of art.
Those who are interested in the whole process are welcomed to join the Garden Club. Those who prefer to simply come and enjoy the atmosphere of solemnity, the wonderful smell, and soft air of the wicking are more than welcomed to join in this process. Ages 7 and up may participate in this yearly event.
Candlewicking is held the Traditional first week of Advent (2nd Week in November), in the Swan Factory kitchen and hall.
.
.
.
.
.
.
Cordwaining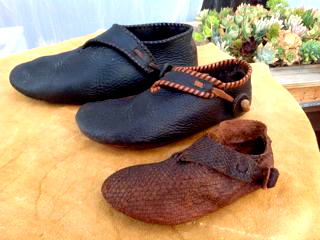
Cordwaining In many ways is really a skilled art. Those who intern with our Master Cordwainer, River Segel, will have a different arrangement made like our other skilled craftsmen. When it comes to the practical folk arts there are opportunities to work throughout the year with different ages and groups, different levels of skill along with studio time.
Every autumn there is an orientation and introductory, classes are offered every Saturday and special Group Lessons Tuesday afternoons and evenings. During Festivals, there are demonstrations and opportunities to sign up for weekly classes during the seasons.
All ages are welcomes to attend the classes or demonstrations.
For the very young children (ages 4-9), they will be welcomed into the studio to observe how shoes are handcrafted. They will have their feet measures and drawn. They will get to look and touch the tools of the trade and learn how careful one must be when working with such delicate and sharp tools. For the little ones, they will learn a bit about the history of shoe making and their importance through the classic tale of the Elves and the Shoemaker. They will also be able to see shoes made at different stages and watch the Master at work.
The following week, children, ages 10 through 14, will make a pair of canvas shoes. They will learn how to measure, cut and stitch this material by hand and learn about the shoemakers knots. If their interest is peaks they will move on to learn more about the history, development and importance of Cordwaining and start to learn the difference in the quality of materials and see how some heavy machines, used in cutting and stitching, are used.
From there they will create a Turn-Shoe, cutting and stitching the shoes by hand. They will also learn how to use the leather sewing machine, creating a pair of Suede Moccasins and learn several ways to cut, fashion and attach a hardened leather sole to the bottom of the shoe. At this point, they may decide to take up an internship by producing a fine braided Leather Flip and create other leather goods, working with quality suede and nu-buck leathers.
Over time, those who take up an internship will learn how to care for the materials, do repairs and develop their own creative ideas. A few of the interns have created an array of leather goods, selling them at Festivals, the Gallery, Co-Op and at Thrift Shoppe Fensalir. Some of our interns have also taken up the skill of leather bookbinding.
If interested a hand full of people will be invited to make the Caligae, make a pair for yourself and one for the theatre.
The products made will not only last a lifetime; some generational, the skills, discipline and patience learned can be applied to any life endeavor..
.
.
.
.
.
.
 Folk Arts Weekly
This Club is dedicated to the area of hand-crafted folk art. The shelves and draws are full of fine natural materials to work with throughout the year. Members learn mostly and traditionally from each other. Occasionally, a special guests will be invited to speak about our traditional cultural folk arts. Topics covered will include the countries of origin and history, how to collect the materials needed to create the craft, and how to assemble and create beautiful hand-crafted works. Beyond preservation plastics and modern chemicals are not encouraged, the emphasis is to use what our settler kin brought with them and discovered in the new world.
Much of the fun in this Club is gathering the materials. Everything starts from scratch, and there’s plenty to observe, learn and discover all along the way. Nature plays a big role in the Folk Arts, every element is used, earth, water, air and fire – mineral, plant, animal and human. Gathering the materials takes an act of will. Designing what you wish to create using your imagination, having skills and ideas, inspires one to become more creative. Learning to reason out the skills and design requires full concentration until one day you become the master of your task. You have intuitively developed an understanding of the materials. Through your skills, sense of design, form and function become so dynamic and robust that you can dream and create whatever you desire. You know your Art so well that you can feel it in your bone. Developing a skill in this way opens the door to developing other skills even faster and without fear. This is truly the path to Life as Art.
The Folk Arts room is always open, however, children under the age of 12 must have adult supervision. Notices are posed when help is needed to collect materials. It is always good to bring your favorite pocket knife, a pair of tough gloves and sturdy boots. A schedule will be posted on the bulletin board and online for craft demonstrations throughout the year, along with notices of any invited guests speaking on a particular topic or craft presentation.
 What is available and what you will learn:
Basket and cord making: plant, bark from branches and tree fibers.
Trinket Box – bergamot box.
Cardstock baskets.
Tissue Paper Art – geometric window stars and balloon shell lamps, collage.
Oil Lamp – clay, from brick kiln.
Cordage twine – nettle, flax, cedar, milkweed, dandelion, etc…
Papermaking – nettle, straw, bark, rag and pulp processing.
Straw people – people and animal making from straw.
Spoon and bowl carving – how to make a wood spoon and bowl out of tree branches and trunks.
Bird house building – during Christmas week, workshops are offered for constructing bird houses to help feed and protect the local birds.
Mask making – 18c plaster mask making.
Puppet making – hand and string puppet making.
Treasure chest – the making and carving of a box to hold and keep all your treasures.
Wool-wisping – how to make raw wool wisp angels.
Working with nature – there are great opportunities to work with planting and upkeep of the PEACH gardens through landscaping, pond building, and instructions on gathering and using materials and tools. We have several special gardens at the PEACH, the Shakespeare garden, the birthday koi & sun fish garden, the herb garden and the four seasons garden. There is also an area to grow plant dyes.
Beeswax modeling – the egg.
Plant pigments – making of watercolor paints using plant and mineral materials.
Silhouette and story telling – the art of story telling using light and paper.
Clay -kiln, raku and kintsugi pots.
Needlepoint and quilting – patch and pillow.
Nalbinding – twine and yarn – hats, bags, mittens, socks
Stone setting – inlay.
Cookie cutting – making simple butter cookies without measure.
Doll making – wool and porcelain.
Geometrical drawing – repeated patters with pencils.
Soaps, scents and tinctures – natural soap making.
Thorn Stripers – thorn wraps to strip grasses
Plant Dyes From Nature – sumac, bloodroot, black walnut, golden rod, yarrow, burdock etc…
Food Dyes From Nature – turmeric, onions, blueberries, elderberry, rosehips, etc…
Spice Pigments – turmeric, charcoal, eggshells, red clay, lapis, etc…
.
.
.
.
.
.
.
Folk Music
Banjo Cat n’ Fiddle de Dee stroll at will during the summer months, catch them playing folk tunes at the Farmer’s Market, the Artist Fairs and during contra dancing. Lessons, concerts, lectures at will.
JW Malaki’s roaming guitar, strolls the grounds whenever the sun is shining or a fire is lit. For private or group lessons, concerts, lectures, contact JW.
Jim’s Fun Time Accordion and Concertina will perform at the Great Race & Follies, Farmer’s Market, and during contra dancing. For private or group lessons, concerts, lectures, contact Larry “Jim” Welks.
Uri Kai – vielle a roue, a.k.a. hurdy-gurdy or wheel fiddle. Uri is a local artist who will occasional play at our different festivals and events. Twice a year he offers a lecture on the instrument and the music of the Middle Ages. He doesn’t offer lessons unless you are willing to purchase an instrument, but he will bring one when he speaks and allow people to give is a whirl.
Paper Bluegrass Fest – The 3rd Friday and Saturday in August. Music, BBQ, Distilled Spirits and a Weekend of Papermaking at the Printer’s House. Bring your fiddle, string bass, geetar, banjo, spoons, washboard and hush-puppies for some toe-tappin’ music, scrumptious vittles and some serious papermaking. Any and all proceeds go to support our roaming musicians. This is mostly a private affair, but if you’re-a-askin’ nicely, and say the secret word, you’re welcome to attend. Contact, Albert Kirchner, for more information.
The Wanderer – Did you know he can play the spoons?
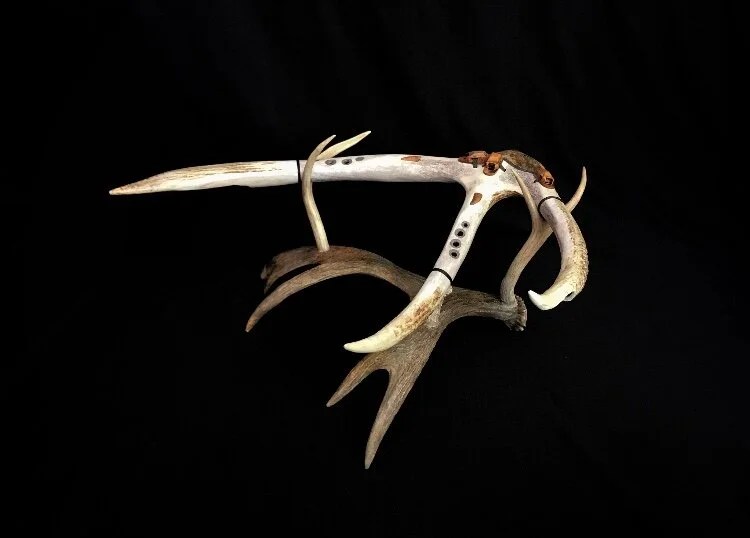 Nature’s Instruments – Learn to make a Rootflute [Antler] and other instruments of the natural world. Making a Rootflute is a fascinating and labor-intensive craft. Most antlers used are naturally shed “roots” found in the wild — only a few are taken during hunting season. Other instruments are simpler to create, yet each carries its own rich, primal and natural sound. Through this experience, the creator will explore how tin, copper, wood, shells, and stone can be fashioned into musical instruments, each echoing its natural texters and unique formations. Many who take part in developing these instruments often find the craft creates a personal and spiritual journey. The course runs six weeks, and is offered twice a year. Bring a journal, and come prepared with an idea of what area you’d like to work with before signing up. There is a glass case display in the library with a number of ideas people have created and donated, this will allow you time to decide what you would like to create and work on.
.
.
.
.
.
.
.
.
.

Mosaic
How do you make rocks, stones and the mineral world come alive, leaving a lasting legacy? By pounding sand, along with cutting, chiseling and tumbling. Our Master Mason and Stonecutter Kipling Sibelius Scott and his Journeymen will show you all the tricks of the trade. How to bring stones and rocks to life and the skills needed for their upkeep and repair.
Kip has several projects always going, if you are interested in stone, this is the man to work with. Currently, Kip, and the fellas, along with several interns and residents are currently working on the floor mosaic in the lobby of the Arts Center. With a little instruction, he will show you how to cut and lay tiles. The task has been said to be a work of meditation. Inch by inch, this simple yet skilled work of art is being constructed into a work on par with the floor of the Vatican. If this sounds like a project you would like to take part in, there are orientation and hands-on demonstration every Monday at 7PM. When working on this project, the pattern is set and easy to follow, but there is no timeline. Come when you are in the mood or wish to meditate.
For the Father’s and Son’s Club, Kip or his trusted Journeymen will demonstrate chinking and general masonry including, a trip out to the quarry. Tools, materials, environment and timing will all be addressed. Buildings, walls and floors will be part of the experience. There is always plenty of hands-on work for young lads to take part in and learn a valuable skill.
We at the PEACH can’t say enough about Kip. There isn’t a building standing or a path traversed his weary, worn hands have not touched. Kip works with everyone at the PEACH, anyone wishing to add stones, rocks or gems to their projects or designs. Tumbling, inlay and marble sculpture are his forte. If you have a project in mind, he will always find time to lend you a hand or show you how it is done.
Every other year, Kip conducts a trip and tour to Italy. He takes his fellow travelers on a mosaic tour of Rome, the Vatican and to the quarry where Michael Angelo spent a good portion of his time, the infamous Carrara Quarry. This is the quarry where Michael Angelo’s masterpiece David was formed. During the trip there will also be a visit to the School of Mosaic, in Ravenna where visitors will spend the day at the school working with ancient stones, they will learn ancient stone cutting and polishing techniques, and they will attend a lecture by world renown mosaic artist Luciana Notturni.
.
 .
.
.
.
.
.
.
.
.
.
.
Sheep-Shearing, Wool, Silk Washing & Spinning
Sheep-Shearing, Wool, Silk Washing & Spinning
Wool – Baa, baa, black sheep, have you any wool? Yes sir, yes sir, three bags full! One for the master, and one for the dame, one for the little boy who lives down the lane.
Managing sheep or butterflies is a vocation. To be a Shepard and Shepherdess requires dedication and a good, trusted and loyal border collie. We don’t keep sheep in our pasture unless asked to do so for those having a difficult time with other members of the flock, or providing an isolated area for a mother and her lamb having a hard time connecting. We work closely with our neighbors, Isla Farms, who have a flock of 50 Swaledale and Herdwick Sheep. A number of young people in the community will work and help care for the flock: bringing them out to pasture, feeding, raking their stalls and generally lending a hand with chores on the farm. Isla loves to bake and the children who lend a hand always find a warm biscuit or a powdery treat, along with a glass of fresh raw milk from the farm’s cow. It’s a wonderful way for tweens, teens and adults to care and connect this way with the animals.
 Wool
Wool
For everyday one of work put in by one of our members, we receive their weight in prime fleece during spring sheering. We also get to grab the leftovers when it’s time to clean-up. In late spring this wool is soaked in large tubs for a week outside the butterfly house, and in June it is washed and then laid out to dry. A week later it is washed again two more time until it is clean and ready to be carded.
Once August arrives, the wool is dyed using plants collected from the area. Once these batches have dried the wool is carded once more and by September ready to be spun into glorious balls of soft, warm wool fleece, ready for any project. This wool is then sold at the co-op and Thrift Shoppe Fensalir.
Those who wish to knit their own design ideas are welcomed to help in the process of shearing, washing and spinning. Members always receive a generous discount from Isla Farm for their fleece.
Silk
During the year, our silk moths are busy crawling and eating, spinning and hatching. The cocoons they weave are collected, washed and spun into silk.

It takes about a fortnight for the egg to hatch, Once hatched these squishy strange looking caterpillars eat endlessly for 28 days. They love Mulberry leaves, so inside the butterfly house are 3 Mulberry trees along with piles of extra leaves collected from other trees surrounding the house, these are laid out on walls full of slates with narrow counters below. After the 28 days, the caterpillars start to look for a cozy corner to build their cocoon, so they climb up the slats. Once they find their corner, the process of building their cocoon takes about a week. Each caterpillar will spin a mile worth of silk thread. After a fortnight a winged creature will emerge, mate within hours, for about a day, then the females will lay 100 to 300 eggs over the next week and the whole cycle begins again.
Three times a day, someone will look in on the house. They check the temperature, make sure the mister is working properly and filled with water, the moisture levels will be checked for the trees and a look around for any strange predictors that may have slipped in and are lurking inside the house. Any empty cocoons will be gathered and placed into the basket. Once the basket is full, the cocoons will be prepared for washing, dying and spinning.
Silk moths are very friendly insects, they are also quite beautiful, and they love to eat, it’s a shame their life cycle is only 70 days.
Washing & Spinning
Contrary to popular belief, wool washing is a very delicate process. [tbc]
.
.
.
.
.
.
.
 Glass Club
Like Mosaic, only with Glass and Iron.
The Glass Club is gear towards very responsible people, simply because of the nature of the medium. However, there are very elaborate demonstrations every month on the First Saturday (see schedule), at 10AM. Registration is required and space is limited. There is also time set aside for those registered in the Folk Arts and Family Clubs.
This Club is also part of the branch of Skilled Interns and Apprenticeships. This gives craftsmen the opportunity to work and share disciplines with other Skilled Clubs and Craftsmen.
All areas of the glass club and factory are under the direction of Master Gaffer Michael Owens.
In addition to the demonstrations, there is a Stained Glass Club that meets on the 4th floor of the Swan Factory every Saturday at 11AM. This club is run by Barbra Owens and is opened to anyone 14 years and older. There is also time set aside for those in the Folk Arts and Family Clubs during the week (check schedule).
Stained Glass
The Stained Glass Studio is on the top floor of the Swan Factory Building. The studio is surrounded by windows on all sides, so it is the perfect canvas for hanging any work created by the members and visitors. All the windows open at the top so as the sun shines there is air in constant circulation. Along three sides of the studio, below the windows, are long narrow tables and benches, these are set up as work stations, there are shelves for tools, flux, and solder iron., each station also has a magnifying studio lamp. On the northern wall there is a room with several grinding machines, a storage area for shards, and a large ventilator. Masks and goggles are required at all time when entering this room. In the center of the room is a 10′ walnut table with a beautiful 5′ Tiffany shade draping over the table. This shade was designed and made by the glass, iron and woodworking clubs under Barbra’s direction.
The Club is set up as a Studio. Working with glass, metals and electric tools requires a certain amount of responsibility and safety. To be in the Club, you have to either demonstrate your skills, an understanding of the tools, and equipment. If you are new to the art you can attend an orientation and put in 20 hours of learned skills and observation. Barbra offers Introductions Classes 4 times a year. A safety course is also required every year for all members. There is no food allowed in this part of the building, water bottles or liquid containers must have a cap on them at all times. However, members are welcomed to spend time in the lunchroom on the 1st floor or spend time in the outdoor patio.
In the north-east corner of the studio, Barbra has her own workshop, where she produces made-to-order custom pieces. There is also a gallery of her work, along with the work of others in the art of glass. You can always find Barbra at one of the Farmer Market Tables every Tuesday during the season.
Venice to Prague
Every 2 to 3 years Michael and Barbra plan a bike and train trip from Venice, Italy to Prague, Czech. They ride through the countryside and mountains along the designated UNESCO routs. They stay in some very lovely bike hostiles and take tours of both the Italian and Bohemian Glass factories and studios. This is done in the month of August. If you are interested, sign up early.
.
.
.
.
.
.
.
 Printmaking & Bookbinding
Like many arts at the PEACH they intertwine with each other, if not in the creating, in the performance and shared interests. Printmaking and bookbinding are no different, especially in the Folk Arts
History
Outside of symbols, writing came late to the Celts. The Greeks and Romans far exceeded the Northern Barbarian Tribes in this way, but the capacity for memory was far more advanced. It was prized among the tribes, and indeed necessary. It was the Romans who carried the letters north, and the Roman Catholic Church that brought the books forward. Furthermore, it was often written in the journals of the monks and priests who traveled through the northern lands that when they read from the holy books and the tribal people saw the characters on the pages, they believed the words were indeed demons.
Over time, as the Christian faith spread, the people were eventually converted into good Christians. The monks then taught them how to read, and read they did, and write, and since that time, some of the greatest literature the world has ever known.
Although it is easy to say that the church put the book into the hands of the commoner, what really spread the practice of reading and writing was in actuality the Black Death. How, you might wonder? One idea offered is that after the Black Death subsided so many people had perished that their wealth and savings were passed down to their next of kin who spent a good portion creating a new economy. This made many more people wealthy, it put money into the hands of the common people, and by the High Middle Ages what did they buy with all this new wealth? Underwear. The impact of this modest fashion lifted society to higher pursuits, more underwear meant more rag, more rag meant more paper, more paper meant more books, and by the time of the Renaissance, the printing press pushed this process fast and forward. Knowledge was spreading everywhere throughout Europe and not just for the church, anyone with money could buy a book. If it could be printed, it could be published, and if it could be published it needed a shelf to be kept. The book itself needed a strong cover and good rag and the best inks.
A book was not a trifle, books had long been established by the church, written by and adorned by the disciplined hand of the monks; usually under horrible conditions and at their peril if they made a mistake. The words, the letters, the sounds had deep meaning, they were holy words, venerated and treated with great reverence. God’s words made whole.
However, once Gutenberg’s Press came along, it was skies-the-limit. However, because of their past, books were still treated with prestige and respect. In the 18th century, when it came to passing on knowledge, Benjamin Franklin knew their importance, especially for the commoner. In the 1830s, he opened the first subscription library service in the US, 40 years before he founded the Post Office.
Making Your Book
In the PEACH Folk Arts Club, you will hear the history of the book, cover to cover. From the making of papyrus and rag, the use of carving symbols from wood, the shape of the letters and what sounds the original letters made. You will take all the elements of creating your very own book from scratch, create the paper, print your ideas, then bind the pages and sew the cover just as Gutenberg would have done. There’s no doubt this work will be kept and cherished for generations to come.
[tbc]
.
.
.
.
.
.
.
.
.

Sewing Club
Everyone sews. For most people, it is the first skilled craft they learn to do as a child. From stringing beads, to mending a tear, to stitching a patch onto a favorite article of clothing. Our sewers, however, have taken this folk art to new heights and levels of skill.
Sewing is considered a fiber and fabric art and craft. For most of its existence, sewing has been done by hand. The majority of people still mend their clothes, make a personal gifts, or try their hand at a new easy-to-do crafts.
Weaving, knitting and crocheting are extensions of this art. It wouldn’t be wrong to say that sewing found its place in the world first from basketry, and moved on into mending, needlepoint and quilting. Sewing has been around a very, very long time.
Brief History of Sewing
Sewing is the joining or the attaching of fabric, fiber or skins by stitching. This is also called stitchery, textiles or needlework. When fastening or attaching objects together, this stitching is done with a needle and thread. In the modern age, sewing is best known as a fiber or textile art. Yet, it is one of the oldest skilled arts and crafts in existence. Archeologists have some pretty good evidence that it rose up during the Paleolithic Era – 10,000 BC. Some ancient remnants found in European and Northern Asian were animal skins and furs threaded together by animal sinew, hair and veins, as well as catgut, and a variety of grasses and fibrous plants. The tools they also discovered were bones, antlers and thorns, used as needles.
Over time, other grasses and animal fibers, such as wool and silk, were used as threads. By the Copper Age – 5000 BC, metal copper needles were crafted with an eyelet, and by then weaving was also well underway. Very little changed until 1800 BC, when iron-steel was forged. Needles were now used to sew leather sandals, vests and helmets. By the 5th century, knitting began to appear and the knotting of leather was all the rage. Between 700 AD and 1300 AD iron became harden steel and needles could be precisely fashioned and the finer work began to show up, especially in tapestry and needlepoint. By the late 1700s, the first sewing machine was cast.
Since then, sewing machines grew bigger, stronger and more detailed, but since it’s inception little has changed. Moreover, the sewing machine gave way to the entire Industrial Age, from clothing to linens, shoe making, upholstery, sail-making, bookbinding and anything that requires joining two objects together could be done relatively fast and efficient.
Most of the sewing at the PEACH focuses on clothing, mending, embroidery, needle point, tapestry, quilting, appliqué and patchwork. There is some tailoring and dressmaking, curtain making, which is done by both textile artists and hobbyists as a means of creative expression and work with purpose.
Classes
In the winter, some of our sewers offer classes for both adults and children. The feeling all around is everyone needs to learn how to sew and knot a rope.
Classes begin with a brief history on the topic, as well as, opportunities to sew with a needle made from: plant (hawthorn), animal bone (small bird), animal fur (bear, porcupine), metals (copper and iron), modern metals (steal). Using threads made of grass, flax, cotton, silk, horse hair and wool. You’ll play around with the needles and threads, create an interesting needlepoint tapestry with what is on-hand. The stitches you will learn are: running stitch, back stitch, whip stitch, slip stitch and blanket stitch. All the basics. If you join the Club, you’ll also go out and gather and learn to make the tools and threads above. Once you have that covered you’ll learn how to use several sewing machines: treadle, electric and computer.
Needlepoint
There are always people happy to help you with needlepoint. If you have patience, are focus, you will develop a meditative fine and beautiful skill.
Weaving
There are also opportunities to learn how to weave. You’ll make your own loom by hand, and if this is something you enjoy, we have several other looms of various sizes. You will have to learn how to thread and use them by observation and practice. If you and the weavers feel you’re ready to go it alone, you will have to sign up if you wish to weave a weekend project. We also have two Jacquard looms, one for a serious weaver and one for the children’s 7th grade carpet project. This loom is only available in the summer months to members (see Marie Nightingale).
Knitting & Crocheting
Everyone loves to knit and crochet, and there are plenty of people willing to get you started. You’ll make your own needles to begin and learn to knit a scarf. From there you’ll learn to make a hat, mittens, booties, and a vest. Once you have completed these tasks, you can learn how to crochet a lace doily and then all of the above.
Lastly, every year, in September, we have the Eyes-Shut knitting and crocheting competitions. 20 minutes of death defying knitting and crocheting with your eyes closed. Who can knit the longest scarf without dropping a stitch or crochet a circular doily without missing a loop. Winners walk away with some very delicious baked goodies and a hand printed certificate, by our printmaker, commemorating the day.
Quilting
 Quilting at the PEACH is a Community effort. Now that you know how to sew, you can join the quilters club and sit with the American Settler’s Quilting Circle (yummy baked goods). This is held in the mom and tots room, where they all meet once a week for 5 hours. Full details are on the Practical & Folk Arts Page.
Machines
If you have taken the classes and learned the basic skills of sewing, and you wish to use the machines, you can sign up on the schedule.
Sewing is one of the few tasks taken up all year long. There are no arts, crafts or skills that do not require the use of sewing. Most people do know how to sew, but there’s always something new to learn, taking what you already know and adding ways to enhance your craft is always worth your while.
The sewing room is on the third floor of the Arts Building. There are rules, policies and procedures, but they are only there to make your experience and others a more pleasant one, to keep the studio in order and to make sure the equipment is always in working order for you to use. At the top of the stairs there is a small lounge to your left, facing south, and a room to the back that is for coffee, tea and biscuits. There are cabinets, a sink, a toaster oven and a small icebox. Please look after yourself in this area. To your right there is a very large room with tables, shelves and drawers full of fabrics, fibers, threads, yarns and tools. Towards the back of the large room are the smaller looms. In the way back is a room with two very large looms. There is also a large closet for cloth bolts and batting. Behind the south wall is a room with several sewing machines, including the treadle and computer. There is also elevator access. We do have volunteers who maintain this studio, however, it’s always wise to leave the room looking better than when you arrived
..

“Measure twice, cut once, tie up all lose ends and leave no scraps behind!” -Anonymous
.
.
.
.
.
.
.
.
.
Homemaking
 The history of the European family. This club is geared towards strengthening the developing and traditional bonds of the family, to work together in order to gain trust through friendship and companionship. All ages are welcomed.
This Club encompasses a little of everything we do at the PEACH. It is also part of the Family Folk Arts Series. Each Saturday, from 11AM until 2PM, there will be a new task or workshop for the family to engage in together. Each task lasts about 2 hours, including lunch. This allows members in the community the opportunity to find what they enjoy doing, where their strengths lie, and where they fit-in and feel most comfortable. From cooking to poetry, skating to needlepoint, twine spinning to singing, once you find your niche you’re welcomed to continue on in this club or settle into your new-found fancy or discipline. Homemaking isn’t only about work, obligations and duties, it is about doing things together in order to strengthen the family, friends and the community as a whole.
An extension of Homemaking is Home Life, which is also part of the educational series at the PEACH. Home Life is first and foremost a place of support, information and knowledge. Home Life sets aside time for people in the community to meet and share their life experiences, seek help with any problems or tasks. Opportunities are provided to connect with other people in the community, find trustworthy friends or agencies outside the community, or just looking for a friendly ear or confidant. The resource room is open every Wednesday from 4PM until 9PM, or by appointment.
There are also opportunities to volunteer, meet new people, and attend lectures with guest speaker on the role and importance of traditional family, their values through a balance life and the demands of the working world. Topics such as, Choices, Meaning and Resolution are issues covered in the meetings and lectures.
There are also ways to connect with others who are facing generational struggles and simply looking for suggestions on how to approach different points of view based on the sages of development.
Marie Cassel has been working in this are for over 15 years, she has made an extensive study on the history of the family and European Culture, she has lectured across the country in both areas. Marie is also in touch with the broader community and our political representatives. She is a wonderful resource on resources for the entire families as well as, individuals. Marie is a dedicated member of our community, she is our #1 Community Advocate. Home Life meetings are every Wednesday at 7PM.
Homemaking keeps to the PEACH Calendar.
.
.
.
.
.
.
Soap – Soaper
 If you have ever been camping you may have already made soap. Scrubbing a greasy iron skillet with campfire ashes does not just absorb the grease and scour burnt food away, rinsing the pan with a little water, actually turns into a amazing primitive cleanser. This method of scouring dates back to ancient times.
In the campfire you are using ash, which is a caustic alkaline base, and the grease, which is a fatty acid, is absorbed by the ash. Add a little water, and you have created a mix we call soap.
The process of making soap is actually quite simple, though it can be time-consuming, and explaining what is taking place requires some understanding of basic chemistry, but it is not necessary to know the chemical terms in order to make soap, much like baking ingredients and a recipe will see you through making a cake. However, it helps to understand the chemical reactions and why they happen if you want to experiment with other substances later on.
Once you make your first bars of soap, you will want to try different methods, add fragrances, colors and swirls. Before you know it, you will become a Saponai Artista!
The History of Soap
It was a French soap that was first mentioned in the 4th century by Roman physician and author Theodorus Priscianus, used on the human body for cleaning as a material for washing the head.
 In the 7th century Charlemagne’s text, Capitulare de Villis, 805AD, makes mention of the Italian soap makers. They were organized into what became known as the minor craft guilds. In this case, Saponai, soap-boilers, Soapers.
By the 8th century, soft soap made with oils was common in France, Italy, and Spain, as olive oil was widely available. The liquid soft soaps were called, Arte degli Oliandoli e Pizzicagnoli, Oils and Scents.
The development of these merchant and craft guilds were very important, they produced a set of standards and honest ways of doing business we still use today. The development of these merchant and craft guilds were very important. They produced a set of standards and honest ways of doing business we still use today.
It is believed that the Celts brought soap into England around the 10th century, and by the 12th century the monk, Richard of Devizes makes mention in his Chronicles, Book of Secrets, “Apud Bristollum nemo est qui non sit vel fuerit saponarius” that in the city of Bristol they had a good number of soap-makers and commented on the smelly nature of the profession. This is also the time that hard soap made its way from the Middle East into Europe.
By the 13th century, the Islamic world industrialized the manufacturing of soap, from Nablus, Fes, Damascus, and Aleppo. However, by the middle of the century, Marseilles, France became the first great center of European soap making, of which they still make soap in the same houses today.

From Genoa, Venice, and Bari in Italy, to Castile in Spain, all these cities became centers of the soap-making world. This was in great part due to the natural resources of olive oil and the barilla plant growing in these areas.
Soap became very popular throughout the High Middle Ages, all the way through Modernity today. We still haven’t given up the craft, and very little has changed in the mixing and the types of ingredients used. Albeit, synthetics have now replaced many store-bought or name-brand soaps, but the best still are always the ones made by professional and loving hands.

16th Century Soap Recipe
Making lye from hardwood ash.
Fetch a large 10gal glass beaker, wood or plastic bucket, with a spigot on the bottom – do not use aluminum. Best to do this in a garage or out-doors on a nice day. Fill the bottom of the bucket with woven wickerwork made of withies. Put on a face mask, so you are not breathing in the ash dust. Carefully spread the well burnt ashes over the withies, or on a thin-meshed strong sieve. Carefully, fill the bucket with the ash near the top [about 2 inches]. Gently pour hot water over the ashes so that it goes through soaking the ash. Occasionally, stir gently with a strong dowel. Keep pouring and mixing the water until the ash appears saturated. Cover and let stand overnight [24 hours]. Place a bucket under the spigot to catch any possible drippings.
The next day, grab your safety gear. Dress properly and have a bucket of cold water nearby in case you get any liquid lye on your skin. Also, wear safety glasses. Very slowly and carefully open the spigot into the large bucket, collect the lye. To strengthen the mix, run the liquid through the same ashes a few more times. This will create a nice dark color, allowing the liquid to leach the base [potassium oxide -KOH] which you need to make soap. Once you are finished with the ash, pour the liquid lye through a filter; an old t-shirt works well, into a stainless steel pot. Filter as much of the ash and debris out as you can.
Test the lye using the egg, potato or litmus paper test to get an ides of how alkali the lye is and its pH number. If the egg or potato floats or the paper turns to a very dark violet, you’ve created the first lye of the Soaper.
There are a few ways to go from here. Continue boiling or pour your filtered lye into a glass container, let it sit for a few weeks, in a cool dark place. The longer it sits, the stronger and clearer it will become. Filter once more before boiling.
Boiling the lye
Boil the lye liquid down to a concentrate. Always filter the liquid ash and debris. Boil and reduce the liquid again. Continue this process until the egg or potato float. The concentration of the lye is very important moving forward, make sure the solution is strong. It is usually better to concentrate by reduction. This clarification is called the second lye of the soap-maker.
After the float, pour the lye through a filter into the glass container. Clean the lye pot well, prepare by slowly heating the oil or fat. Do not let the temperature exceed 110°.
Cooking the fat
Use 1 cup fat, to ⅜ cup lye.
Once the fat is melted, or the oil is heated, start adding the lye. Stir with a wooden spoon continuously. If your lye is well concentrated you will see a trace in a few minutes. If not, keep stirring.
This will create a soft soap. If you want a harder soap, add a teaspoon of sea salt. Stir until the mix turns into a trace, usually a thickish glob, like pudding. This can take a few minutes to a few hours, depending on your lye concentration.
Keep the mix warm, not hot, nor cold. You want it thick, but not hard. You want it soft, but not separated. This process is called Saponification.
Once you achieved trace, add in your fragrance, use oil-based essentials only. Remember, high volume oil concentrate in most fragrances will go a long way. Use a few drops at a time and mix well.
Prepare your mould. There are a variety of shaped moulds you can use. However, plastic moulds are easier to work with, and often work best.
Once the soap is in the mould let it sit overnight. The next day, if they have cured a bit and seem solid to the touch, remove them from the mould. Since the soap is still pliable, this is a good time to cut the mass into bars or smooth and clean the edges. It will take 4 to 6 weeks for the soap to completely cure. Keep these bars in a clean, cool, dark place. Check in at least once a week and turn the bars, so they dry evenly.

.
Soap at the PEACH is made throughout the spring, summer and autumn months. Sally Birdwhistle offers weekly and weekend projects during this time. She will also give a lecture on the history of soap-making, and she offers a special lecture in February on the history of the Medieval Guilds. Sally also arranges to bring in other soap-makers as special guest to share their secrets. These are often expert Soapers who have and may share their private recipes and craft.
You can find Sally’s Soaps and Scents for sale at the KSDF Apothecary, Four Winds Co-op, Fensalir Thrift, Tuesday’s Farmer’s Market and at the Artisan Fairs.
.
.
~Side Notes:
 Container: 10gal plastic, wood or glass works well with a bottom spigot.
Avoid aluminum with lye. The lye will eat through the metal.
Create a filter bottom bed using surplus twigs and hay.
The strength of the lye can make all the difference, especially when it comes to your time. Make sure when you do the float test that your egg or potato comes up, pops its head through the surface of the water, by at least the size of a quarter. Any smaller could mean your lye will be too weak to make a good and quick trace.
If your soap is taking too long to create a trace, add a bit more concentrated lye with a pinch of salt.
Another approach is to mix your lye it with quicklime. That toughens and clarifies your mix fairly quickly.
If you want to make soap out of tallow, the process will be the same as other oils and fats, though instead of oil, put in well-beaten beef tallow and add a little wheat flour according to judgment, let this cook to the thickness of oil or lard.
Allow any heated mix to cool in a clean, cool, and dark place.
Fragrance strength is a hit or miss process, it is always best to add it at the end of the saponification. Keep in mind that some oils can turn your trace into soup so you may have to take a step back, or try adding a pinch of salt. If you add your fragrance too early in the process you will lose most of the aroma, so do it before setting the mould.
.
~Glossary:
acid – a solution which has a pH less than 7.
alkali (alkaline) base – solution which has a pH greater than 7.
ash – the powdery residue of matter that remains after burning.
potash – potassium carbonate, ash obtained from plants or wood. caustic potash – chemical formula KOH.
potassium hydroxide used to make lye solutions for liquid or soft-paste soaps.
barilla – a sodium-rich plant whose ashes were used to make soda lye, a perfect combination to make a beautiful hard white bar of soap.
base – see alkali.
caustic – corrosive effect of a chemical on living tissue.
cold process – each solution is heated separately, then the lye is mixed with oils, fats, or butters together without additional low heat.
cure – a process that makes a harder, less caustic and gentler soap, it also produces more lather. alternate every week. 6 weeks total to cure.
egg & potato test – a float test to determine if the lye is the correct strength to make soap.
essential oils – EO – undiluted volatile oils extracted from plant matter by distillation, expression, or solvent extraction.
fatty acid – number of milligrams of KOH (potassium hydroxide).fatty value – free fatty acid (fat or oil) needed to neutralize the acid.
hard and soft soap – cold or hot process, thin or thick texture, brought about by the strength of lye and salts used.
hot process – soft soap, once you start mixing, don’t stop – this is a very fast process.
lye – alkaline liquid obtained by leaching wood ashes with water. Lye is the caustic used to turn oils and fats into bar soap.
Mappae Clavicula – a medieval Latin text containing manufacturing recipes for craft materials, including: metals, glass, mosaics, dyes, tints, soaps, and a number of other crafts. A materials key to the World of Medieval Techniques, written in the 12th century.
oils – a variety of acidic plants and foods. lauric acid: coconut oil. stearic acid: palm oil and lard. oleic acid: olive, cod, corn, palm oils. linoleic acid: soy, vegetable, nuts, seed oils, meats and eggs.ricinoleic acid: castor oil.
quick lime – calcium hydroxide [Ca(OH)2] hastens the soap-making process.
pH – potential of hydrogen, a measure of how acidic/base water is.
safety gear & supplies – eye goggles, face mask, apron, rubber gloves, sink and running water, stainless steel pots, wood spoon, cotton filters.
sea salt – used to hasten the trace hardening process, making the mix thicker.
soaper – a person who practices soap-making.
trace or streaming – this process tells you when the soap is thick enough to pour into a mould. Thin tracing: like honey. Medium tracing: like pudding. Thick tracing: like mashed potatoes.
.
.
.
.
.
.
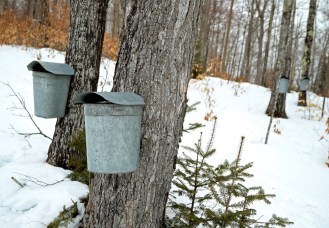
 Tree-Tapping
Part of the farm and wooded areas at the PEACH are the many trees in our forest and around the property. Members learn about the trees in the woods, along with how and when to tap the golden delicious syrup collect from our trees. The trees, bees and butterflies are three of the commodities we store and use for trade with other like minded communities.
Out botanist Dr. Linnaeus helps us tap all our trees. He knows exactly what to do, when to tap, where and how deep to place the spile (taps), how many spiles to bore and when to let the trees rest and sit quietly for a few seasons.
Tree Tapping is part of daily life and also part of the Family Cultural Folk Arts Club. This process begins by learning to identify trees and plants in the perma-forest. It ends with the making of maple syrup, butter, sugar and candy.
At the edge of the forest is our sugar shack. It’s loaded with wood for the cooking fires and there’s enough room for three fire pits in order to boil off three pots of sap for each pit. There’s also plenty of room to sit back, play some music, tell some old tales while stoking the fires.
Around the middle of August and over the winter the sap in the tress is stored in its roots. As the temperatures start to rise during the day the sap begins to flow upward, through fibers (xylem). Trees are tapped when the temperature drops below zero. The season is over for all collecting when the buds start to swell and get fat.
Sugaring
In November, we mark the trees that will be tapped in green and yellow ribbon Once winter arrives, we wait for below-freezing temperatures to pass through, about 30 days. We then take a sunny day and hammer in the spiles, also known as, tapping the trees. After we drive the spiles we hang the buckets and check them every day.
The Settlers
Maple Trees are unique to the US and Canada. When the Settlers arrived, this must have been quite the discovery and a wonderful treat. Europeans in the old world had used tree resin to produce glue and turpentine, discovering the sweet maple syrup would soon serve all their sweet tasting needs.
How the Settlers collected the sap and used it as foodstuff is more or less inconsequential, figuring out how much you need to make enough for pancakes is what is important here. Using the methods the Settlers brought with them from the old world work the same in the new. Reducing the plants through boiling would produce enough sap and syrup to last the entire year.
However, it is no small feat to get to the delicious and delectable syrup, the ratio is 40 to 1. Nonetheless, even though using maple sap and making maple syrup is a bit of a process, every step of the way the sap can be used in a verity of ways and of course eaten.
 When seeing the sap for the first time, it surprises most people how clear it looks, like water. Although, its consistency is a bit heavier than water, and a bit sticky. It’s not syrupy sweet yet either, but it does have a bit of a sweetness to taste and slightly sticky when dried. So though you might not wash your clothes or brush your teeth with the sap, using it to make breads, boiled meats, cooed vegetable will make your food a little sweeter. However, it does have a distinct taste. Lastly, the sap right from the tree is really a wonderful way of brewing coffee and tea.
In the dead of winter, back in the 16th and 17th centuries, the Settlers began to harvest the sap in wood buckets. Each tree will produce 20 to 30 gallons of sap per tap. Depending on the tree, each will yield 1 to 5 gallons of sap per day. Settlers would make several daily rounds collecting and storing the sap. Today there are many collection options to choose from. As a teaching tool, we have a group of trees for demonstration purposes, using the old historic methods of wood and tin buckets. For mass collection, we’ll use the 5 gallon plastic collection bags.
At the Peach, we generally have three fires going at once, this should yield at least 80 gallons of sap and 2 gallons of ‘pour it on your pancakes’ syrups for a weekend of collecting. Every day, in the late afternoon, the buckets are collected and poured into a large container. The containers are kept outside, and stored on the north side of the shack, then covered with snow for the night. It is important to keep the sap as cold as possible, freezing temperature are best, not unlike milk, maple sap will spoil.
In the morning, there will either be a layer of ice on top of the liquid or the liquid will be very slushy. The sugar part of the sap is heavier and sinks, but will not freeze, the water will always float to the top. This is a great opportunity to scoop the ice or slush out with a strainer. There are several advantages to this process, less water means less cooking time to boil the sap down, and the opportunity to use the ice water to make some sweet tasting coffee or tea. Finally, we pour the sap through a cheese cloth to capture any bits and pieces of tree bark or other debris that may have slipped in.
How To Make Maple Syrup
 Now it’s time for the fun part.
First Boil – We pour the filtered sap into large, shallow pots with a roaring fire burning underneath. We stoke the fire so that the sap in the pots creates a great steam, we keep that fire going until the sap dances into a rapid boil. Soon a froth starts to build at the top, we collect that because it doesn’t belong in the mix. As the steam boils off and evaporates, we skim the froth off and keep adding more sap. This process take about 5 to 6 hours, and we do this until we run out of sap, stories, and songs.
The change in color is very noticeable now, from clear to a murky harvest gold. When the steam dies down, the liquid will reach the consistency of a very runny syrup. The first boil is now complete. We let the fires diminish and allow the pots to cool down. We then cover the pots and let the sap settle overnight.
You might wonder, why is this being done outside, why not do this in the kitchen on the stove? The sap steam is very sticky and the kitchen walls, floor, counters, and you will become very sticky as well. This is why they came up with the idea of the sugar shack.
The next day we will pour the amber sap slowly and carefully through another cheese cloth filter right into several stainless steel pots. At the very bottom of this pour, there will be little bits of granular debris that have settled overnight from the first boil. We will leave these bits of sap, about a cup, out of the pour. If someone wishes to filter this left out sap, it’s great to use in breads, cakes, and muffins rather than water or milk.
Second Boil – We put the pot on top of a control flame this time. We have both an old propane BBQ and a cast icon stove in the shack. What we will use now is a very important tool, a candy thermometer. We fire up the batch and bring the syrup back to a rapid boil, releasing what is left of the steam while the sap starts to turn into a rich, dark golden syrup. Mmm…, the smell is fantastic! If the trees had a high sugar content, the syrup will look almost black. Once we reach a temperature of 217 degrees, it’s time to turn off the heat. Over all, this process takes about 3 hours. Depending on the time and the amount of sap we have, we either move the pots into the kitchen shack or close up shop for the night.

At the PEACH when we harvest the syrup and boil it down there is always knee-slapping music and all sorts of singing. There is also plenty of sap tasting, and so much to learn about the trees in winter while imagining what they will look like when the leaves return in Spring.
Maple trees aren’t the only tress that have sweet, delicious sap. We tap: sugar maples, box elders, black walnuts, sycamores, birch, and hickory. Every year we try to tap one other set of trees, along with the maples. The tapping and cooking process is generally the same, and because there is less sap to collect the process goes a bit faster, but it is always fun to harvest, cook and most of all eat.
Overall, the collecting runs about 14 days, late January through the middle of February. During the boil-down, those who are in any of the folk club classes are more than welcomed to stop by and make snow taffy, maple-butter, maple sugar and maple candy. It’s a fun and tasty time for all!
.
.

.
.
.
.
.
.
Birch bark oil, sugar – sugar, sealant
.
.
.
.
.
.
Pine tar and resign – sealant, rope, wounds healing, oil lamps.
.
.
.
.
.
.
Weaving –
Sprang frames
.
.
.
.
.
.
Living Pan-European and American Cultural and Heritage Community Center
.
EMAIL: peachcommunity yahoo.com
.
.
.
.
.
.
.
.
.
.
.
.
.
.
.
.
.
.
